Tension Control Bolt, Nut and Washer Assemblies
Advantage of Tension Control Bolts
PRE-ASSEMBLED FASTENERS
Provides matched sets for consistent, reliable tension, and saves assembly time
BOLT, NUT & WASHER (from one source)
Relieves traceability problems
GUARANTEED TENSION
With proper installation, greater than minimum tension is guaranteed
LIGHTWEIGHT ELECTRIC INSTALLATION TOOLS
Facilitate ease of movement and reduce worker fatigue
DEPENDABLE, REPEATABLE RESULTS
Consistent tension is not dependent on tools or labor skills
Installation Procedure
1. Fit the inner socket of the shear wrench over the spline on the bolt and push forward until the outer socket engages completely with the nut.

2. Pull the larger trigger on the wrench. The inner socket will hold the bolt in place while the outer socket tightens the nut. The spline will shear off when proper tension is reached.

3. Remove the wrench from the nut and pull the ejection trigger. This will eject the spline from the inner socket of the wrench. The installation is now complete and may be verified visually.
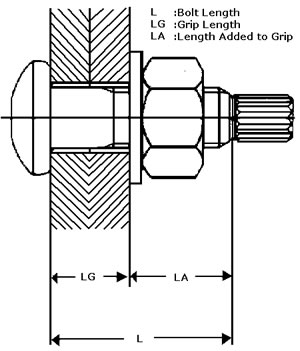
Determining Bolt Length
click image to view larger
To determine the proper length of the fastener that is needed, refer to the chart below for the proper length to add to the grip.
| Nominal Bolt Size |
Length Added To Grip |
| 5/8 |
7/8 |
| 3/4 |
1 |
| 7/8 |
1 1/8 |
| 1 |
1 1/4 |